
8 Best Glute Activation Exercises for Women in 2025
You've been squatting, lunging, and dedicating entire days to your lower body, yet the results in your glutes are falling flat. If you feel like your progress has stalled despite your efforts, the issue might not be a lack of work, but a lack of connection. The secret isn't always about lifting heavier; it's about lifting smarter by prioritizing glute activation.
Glute activation is the process of consciously 'waking up' your gluteal muscles before you ask them to perform heavy work. For many of us, modern lifestyles involving prolonged sitting cause our glutes to become dormant, a condition often called 'gluteal amnesia.' When this happens, other, stronger muscles like your lower back, quads, or hamstrings take over during exercises like squats and deadlifts. This compensation pattern not only robs your glutes of the stimulus they need to grow but also increases your risk of injury and reinforces muscle imbalances.
This guide is designed to fix that. We will break down the 8 best glute activation exercises that are essential for building a stronger, more sculpted posterior. Instead of just listing movements, we will provide a comprehensive look into proper form, common mistakes to avoid, and crucial mind-muscle connection cues. You will learn exactly how to integrate these exercises into your warm-ups and workouts to finally unlock your true glute potential and see the results you’ve been working so hard for. Get ready to stop compensating and start activating.
1. Glute Bridges
The glute bridge is a non-negotiable cornerstone in any routine focused on awakening sleepy glutes. Performed lying on your back, this fundamental hip extension exercise isolates the gluteus maximus with precision, teaching it to fire without interference from overactive hamstrings or lower back muscles. Its simplicity and accessibility make it one of the best glute activation exercises for everyone, from physical therapy patients to elite athletes.
The magic of the glute bridge lies in its ability to establish a strong mind-muscle connection. By removing the complexities of standing or balancing, you can focus entirely on the quality of the contraction, ensuring the glutes are doing the heavy lifting. This foundational strength is crucial for progressing to more complex movements and is a key component in strategies for how to effectively grow your glutes.
How to Perform the Glute Bridge
- Starting Position: Lie on your back with your knees bent and feet flat on the floor, about hip-width apart. Your heels should be close enough that you can graze them with your fingertips.
- Execution: Press your arms and upper back into the floor for stability. Engage your core and drive through your heels to lift your hips toward the ceiling.
- Peak Contraction: Squeeze your glutes powerfully at the top, creating a straight line from your shoulders to your knees. Avoid arching your lower back.
- Hold and Lower: Hold the peak contraction for 1-2 seconds before slowly lowering your hips back to the starting position with control.
Common Mistakes to Avoid
- Arching the Lower Back: A common mistake is using the lower back to lift the hips. To fix this, tuck your pelvis slightly (think of pulling your belly button toward your spine) before you lift.
- Pushing Through Toes: Driving through your toes will engage your quads more than your glutes. Keep the pressure firmly in your heels throughout the movement.
- Rushing the Reps: Performing the exercise too quickly negates the activation benefit. Focus on a slow, controlled tempo, especially during the lowering phase.
Pro Tip: For enhanced stability and upper back engagement, actively press your elbows into the floor. This creates a solid base, allowing you to focus all your energy on the glute contraction.
Sets, Reps, and Progression
For activation, aim for 3 sets of 12-15 repetitions at the beginning of your workout. Once you master the bodyweight version, you can increase the challenge by placing a resistance band just above your knees, adding a dumbbell or barbell across your hips, or progressing to single-leg variations.
2. Hip Thrusts
Often hailed as the king of glute exercises, the hip thrust elevates the simple bridge into a powerhouse movement for strength and hypertrophy. By positioning your upper back on a bench, you significantly increase the range of motion, allowing for a deeper stretch and more forceful contraction of the glutes. This exercise is unparalleled in its ability to load the glutes at the point of maximum hip extension, making it one of the most effective tools for building both power and size.
The hip thrust, popularized by glute-training authority Bret Contreras, has become a staple in the programs of elite athletes and fitness enthusiasts alike for a reason. It allows for heavy loading while minimizing stress on the spine, directly targeting the gluteus maximus and medius. This makes it an essential component of any serious booty building workout plan.
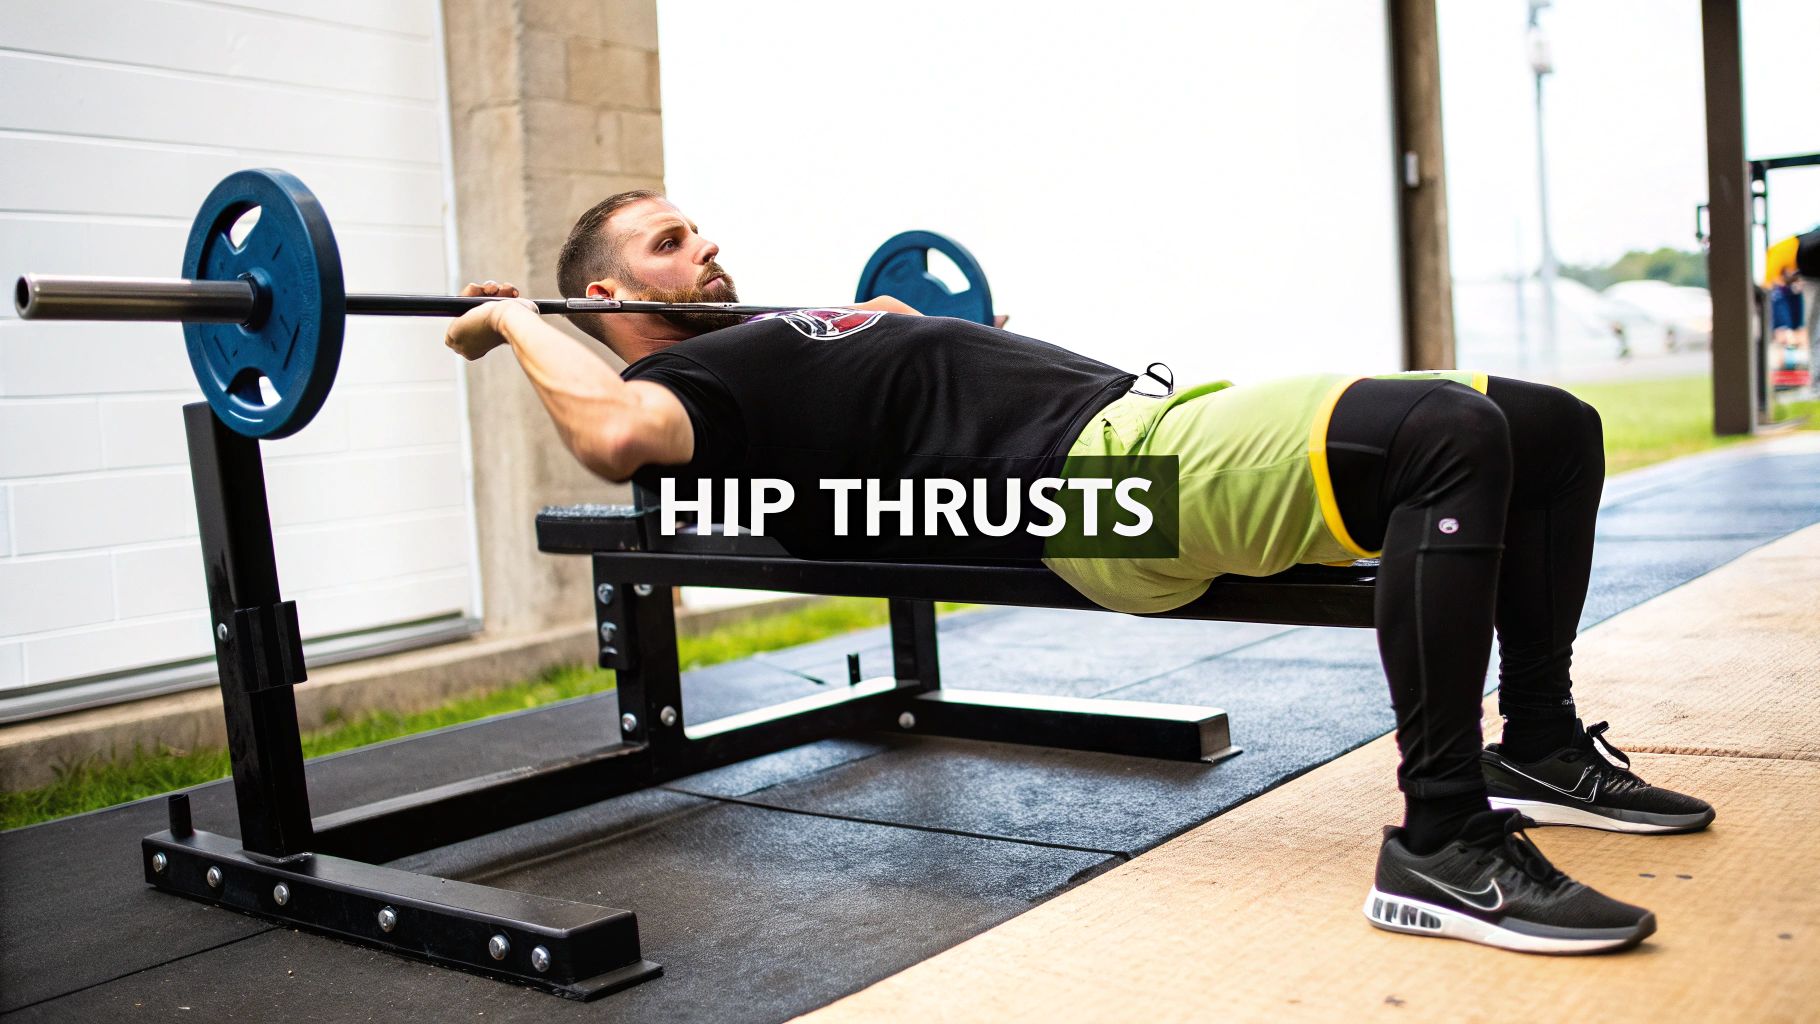
How to Perform the Hip Thrust
- Starting Position: Sit on the floor with your upper back (just below the shoulder blades) against the side of a sturdy bench. Place your feet flat on the floor, hip-width apart, with your knees bent at roughly a 90-degree angle.
- Execution: Keeping your chin tucked, drive powerfully through your heels to lift your hips toward the ceiling. Your body should form a straight line from your shoulders to your knees at the top.
- Peak Contraction: At the top of the movement, squeeze your glutes as hard as possible. Ensure your shins are vertical to the floor to maximize glute engagement.
- Hold and Lower: Hold this peak contraction for 1-2 seconds, then lower your hips back down with control, stopping just short of the floor before starting the next rep.
Common Mistakes to Avoid
- Hyperextending the Back: A very common error is arching the lower back at the top instead of achieving full hip extension. Keep your rib cage down and focus on a posterior pelvic tilt (tucking the hips under) as you squeeze the glutes.
- Incorrect Foot Placement: Placing feet too far away will target the hamstrings, while placing them too close will engage the quads. Adjust until you feel the tension primarily in your glutes.
- Lifting with the Neck: Avoid looking up at the ceiling. Keep your chin tucked toward your chest throughout the movement to maintain a neutral spine.
Pro Tip: Use a barbell pad or a folded yoga mat across your hips when adding weight. This small cushion makes the exercise significantly more comfortable, allowing you to focus on form and progressive overload without discomfort.
Sets, Reps, and Progression
For activation and hypertrophy, aim for 3-4 sets of 8-12 repetitions. Master the bodyweight version first, then progress by adding a dumbbell, a resistance band around your knees, or a barbell across your hips for a greater challenge.
3. Single-Leg Romanian Deadlifts (RDLs)
The single-leg Romanian deadlift (RDL) is a challenging unilateral exercise that excels at activating the gluteus maximus and medius while simultaneously improving balance and hip stability. By forcing one leg to manage the entire load and stabilize the body, this hip hinge movement exposes and corrects muscular imbalances. It's a powerhouse exercise frequently used by physical therapists, athletic trainers, and functional fitness coaches to build resilient, powerful glutes.
What makes the single-leg RDL one of the best glute activation exercises is its demand for coordinated stability and strength. The glute on the standing leg must fire intensely not just to lift the weight, but also to prevent the hip from rotating open. This dual function builds incredible functional strength and sharpens the mind-muscle connection to the glutes in a way that bilateral movements cannot.
How to Perform the Single-Leg RDL
- Starting Position: Stand on your right leg, holding a light dumbbell or kettlebell in your left hand. Keep a soft bend in your right knee and engage your core.
- Execution: Hinge forward at your hips, lowering the weight toward the floor. Simultaneously, extend your left leg straight behind you for counterbalance. Keep your back flat and your hips square to the ground.
- Peak Contraction: Lower the weight until your torso is nearly parallel to the floor, or as far as your flexibility allows without rounding your back. You should feel a deep stretch in your right hamstring and glute.
- Hold and Return: Drive through your right heel and squeeze your right glute to pull your torso back up to the starting position with control.
Common Mistakes to Avoid
- Opening the Hips: A very common error is letting the hip of the elevated leg rotate upward. To fix this, actively think about pointing the toes of your back foot directly toward the floor.
- Rounding the Back: Instead of hinging at the hips, many people bend from the spine. Keep your chest up and maintain a neutral spine throughout the entire movement.
- Losing Balance: Rushing the movement or using too much weight will compromise your balance. Start with no weight to master the form before adding resistance.
Pro Tip: Imagine a laser beam shooting straight out from the heel of your extended leg. Focus on reaching that heel directly toward the wall behind you as you hinge forward. This cue helps maintain a straight line from your head to your heel.
Sets, Reps, and Progression
For glute activation, perform 3 sets of 8-12 repetitions per leg. Start with just your bodyweight to master the form. Once you feel stable, progress by holding a light dumbbell (5-10 lbs) in the hand opposite your standing leg. As you get stronger, you can increase the weight or hold a dumbbell in each hand.
4. Bulgarian Split Squats
The Bulgarian split squat is a unilateral powerhouse that takes glute activation to the next level by challenging single-leg strength, stability, and control. This advanced squat variation involves elevating your rear foot, which forces the gluteus maximus and medius of your front leg to work overtime to control the descent and power the ascent. Its ability to create a deep stretch in the hip flexor and demand intense gluteal engagement makes it one of the best glute activation exercises for building serious strength and shape.
This exercise is a staple in athletic performance programs for a reason: it exposes and corrects muscle imbalances between your left and right sides. By isolating one leg at a time, you can’t rely on your dominant side to take over. This focused effort builds symmetrical strength and stability, translating directly to better performance in other lifts and daily activities, while sculpting a more balanced physique.

How to Perform the Bulgarian Split Squat
- Starting Position: Stand a few feet in front of a bench or sturdy chair (about 12-18 inches high). Extend one leg back and place the top of your foot lightly on the edge of the bench.
- Execution: Keeping your torso upright and core engaged, lower your hips straight down until your front thigh is parallel to the floor or your back knee nearly touches the ground.
- Peak Contraction: Your front knee should form approximately a 90-degree angle at the bottom of the movement. Keep your chest up and avoid leaning too far forward.
- Hold and Ascend: Drive forcefully through your front heel to push yourself back up to the starting position, squeezing the glute of your front leg.
Common Mistakes to Avoid
- Standing Too Close or Too Far: Being too close to the bench will push your front knee past your toes, stressing the joint. Being too far will strain your hip flexor. Adjust your front foot placement until you find a comfortable and stable position.
- Pushing Off the Back Foot: The back foot is for balance only. The front leg should be doing all the work. Keep the pressure light on your back foot.
- Losing Core Stability: Allowing your torso to collapse forward or your hips to drop to one side reduces glute engagement and increases injury risk. Brace your core as if you're about to be punched.
Pro Tip: To target the glutes more intensely, hinge slightly forward at your hips as you descend, keeping your spine neutral. This small adjustment increases the stretch and demand on the gluteus maximus.
Sets, Reps, and Progression
For activation and hypertrophy, aim for 3 sets of 8-12 repetitions per leg. Start with only your bodyweight to master the form and balance. Once you can perform all reps with perfect control, add resistance by holding dumbbells in each hand or a single kettlebell in a goblet position.
5. Clamshells
Often underestimated, the clamshell is a powerhouse for targeting the smaller, stabilizing muscles of the hips, particularly the gluteus medius. This side-lying hip abduction exercise is a staple in physical therapy and corrective exercise for its ability to isolate and strengthen the muscles responsible for hip stability and pelvic alignment. Its focused, controlled nature makes it one of the best glute activation exercises for building a well-rounded and functional posterior chain.
The true value of the clamshell is its precision. By taking gravity and momentum out of the equation, you can zero in on the gluteus medius, a muscle often neglected in larger compound movements. Strengthening this area is critical for preventing knee pain, improving walking and running gait, and creating that coveted "shelf" look by developing the upper glutes. This targeted activation ensures your hips are stable and ready for more demanding lifts.
How to Perform the Clamshell
- Starting Position: Lie on your side with your hips and knees bent at a 45-degree angle, stacking your legs one on top of the other. Rest your head on your bottom arm and use your top arm to stabilize your torso by placing it on the floor in front of you.
- Execution: Keeping your feet together, engage your core to prevent your body from rocking. Raise your top knee as high as you can without your pelvis rolling backward.
- Peak Contraction: Focus on squeezing the glute of your top leg at the peak of the movement. You should feel the contraction on the side of your hip.
- Hold and Lower: Hold this contraction for 1-2 seconds, then slowly and with control, lower your knee back to the starting position.
Common Mistakes to Avoid
- Rocking the Torso: A very common error is using momentum by rocking the hips and torso backward to lift the knee higher. Keep your core braced and your hips stacked vertically to isolate the gluteus medius.
- Lifting the Feet Apart: The movement should come from the hip, not the ankle. Ensure your heels stay glued together throughout every repetition.
- Incomplete Range of Motion: Failing to open the knee high enough or lowering it without control limits the muscle activation. Focus on a full, deliberate range of motion.
Pro Tip: To ensure you're not using your lower back, place your top hand on your hip. You should not feel your pelvis tilting backward as you lift your knee; if you do, reduce the range of motion until the movement is isolated to the glute.
Sets, Reps, and Progression
For activation, aim for 2-3 sets of 15-20 repetitions per side. These are best performed as part of your warm-up. To increase the difficulty and enhance the mind-muscle connection, add a mini-band around your thighs, just above the knees. Progress by using a stronger band or slowing down the tempo even further.
6. Donkey Kicks (Quadruped Hip Extensions)
The donkey kick, also known as a quadruped hip extension, is a classic glute isolation exercise that zeroes in on the gluteus maximus and medius. Performed on all fours, this movement allows you to extend your hip against gravity, forcing the glute to contract powerfully without the involvement of other major muscle groups. Its focused nature makes it one of the best glute activation exercises for building a strong mind-muscle connection and preparing the glutes for heavier lifts.
This exercise is a staple in everything from Pilates classes to athletic performance warm-ups because it effectively teaches you to initiate movement from the glutes. By stabilizing your core and isolating the hip extension, you can feel the target muscle working through its full range of motion. This controlled activation is essential for ensuring your glutes are primed and ready to contribute to compound exercises like squats and lunges, preventing compensatory patterns from the lower back or hamstrings.
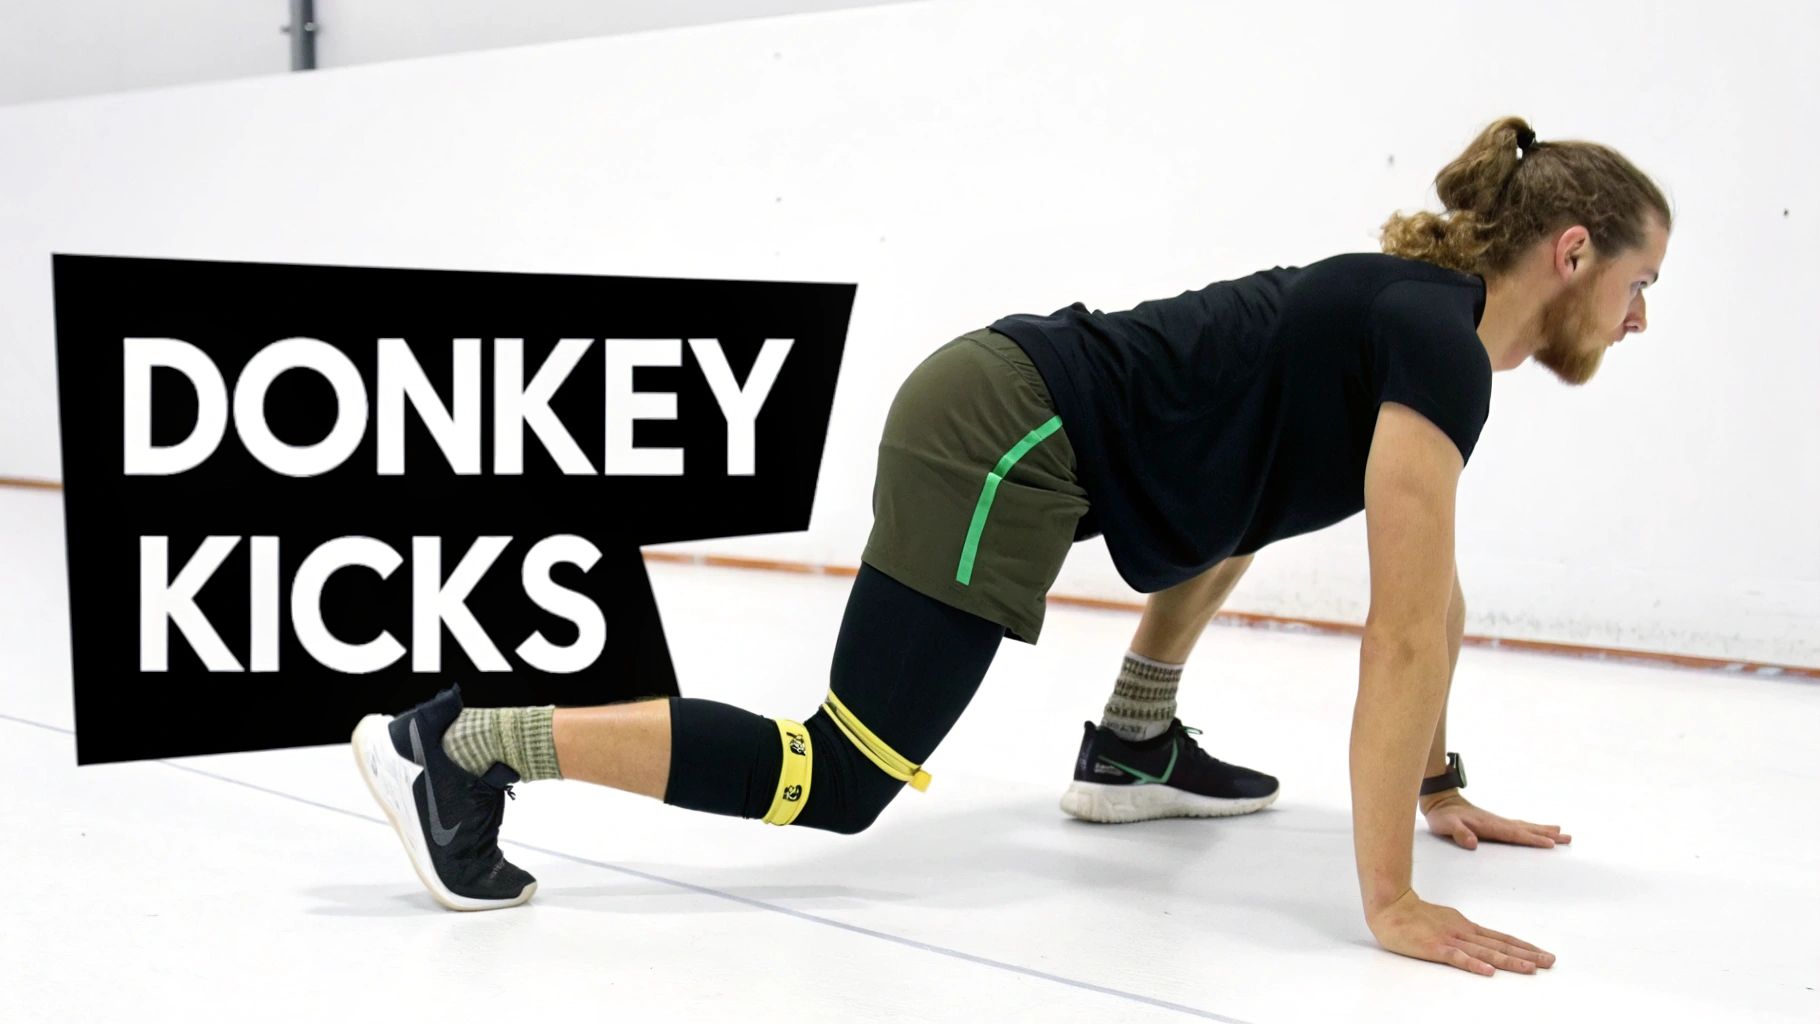
How to Perform the Donkey Kick
- Starting Position: Begin on all fours in a tabletop position with your hands directly under your shoulders and your knees under your hips.
- Execution: Keeping your core engaged and your back flat, lift one leg off the floor, maintaining the 90-degree bend in your knee.
- Peak Contraction: Drive your heel up toward the ceiling until your thigh is almost parallel with the floor. Squeeze your glute firmly at the top of the movement.
- Hold and Lower: Hold the contraction for 1-2 seconds, then slowly lower your knee back to the starting position without letting it touch the ground.
Common Mistakes to Avoid
- Arching the Lower Back: A very common error is extending the lumbar spine to create the illusion of more height. Keep your core tight and your back neutral to ensure the glute is doing all the work.
- Swinging the Leg: Using momentum by swinging your leg up and down removes the tension from the muscle. Focus on a deliberate, controlled tempo for both the lifting and lowering phases.
- Shifting Your Hips: Avoid rocking your hips from side to side to lift the leg higher. Keep your hips square to the floor throughout the entire set to maintain stability and isolation.
Pro Tip: Imagine there is a glass of water balanced on your lower back. Your goal is to complete every repetition without spilling a single drop. This cue helps maintain a stable core and a perfectly flat back.
Sets, Reps, and Progression
For pre-workout activation, perform 2-3 sets of 12-15 repetitions per leg. Focus on the quality of the squeeze over the quantity of reps. To increase the challenge, you can add a resistance band just above your knees, hold a light dumbbell in the crease of your working knee, or add ankle weights for extra resistance.
7. Barbell Back Squats
While often seen as the king of leg exercises, the barbell back squat is also a powerhouse for comprehensive glute development. This fundamental compound movement engages the entire lower body, but with proper depth and form, it places significant load on the gluteus maximus, making it one of the best glute activation exercises for building serious strength and size. It’s a staple in nearly every effective strength program for a reason.
The squat's value for glute activation comes from the deep hip flexion required to reach parallel or below. As you drive up from the bottom of the squat, your glutes must contract powerfully to extend your hips, propelling the weight back to the starting position. Before attempting this loaded variation, it's crucial to first master the basic squat to ensure your movement patterns are solid and safe.
How to Perform the Barbell Back Squat
- Starting Position: Set the barbell in a rack at shoulder height. Step under the bar and position it across your upper back, not on your neck. Grip the bar wider than your shoulders, engage your upper back, and lift the bar off the rack. Take 1-2 steps back and set your feet shoulder-width apart, toes pointed slightly out.
- Execution: Take a deep breath and brace your core. Initiate the movement by breaking at your hips and knees simultaneously, sending your hips back and down as if sitting in a chair.
- Peak Contraction: Descend until your hip crease is below the top of your knees (parallel or deeper). At the bottom, drive powerfully through your mid-foot and heels to ascend, keeping your chest up and your core tight.
- Hold and Lower: Squeeze your glutes at the top to complete the hip extension. Reset your breath and begin the next repetition with control.
Common Mistakes to Avoid
- Lifting with the Chest (Good Morning Squat): This happens when your hips rise faster than your shoulders, placing stress on the lower back. Focus on driving your upper back into the bar as you ascend.
- Knee Valgus (Knees Caving In): This reduces glute activation and puts your knee joints at risk. Actively think about "spreading the floor" with your feet and pushing your knees out.
- Insufficient Depth: Not squatting deep enough significantly limits glute involvement. Work on mobility and only use a weight that allows you to reach at least parallel with good form.
Pro Tip: To maximize glute engagement, think about initiating the upward drive by pushing the floor away from you. This cue helps you use your entire foot for stability and power, ensuring your glutes are firing on all cylinders.
Sets, Reps, and Progression
For strength, aim for 3-4 sets of 5-8 repetitions. For muscle growth (hypertrophy), perform 3-4 sets of 8-12 repetitions. You can progress by gradually increasing the weight, or by incorporating variations like pause squats (pausing for 2-3 seconds at the bottom) to increase time under tension and further challenge your glutes.
8. Resistance Band Pull-Throughs
The resistance band pull-through is a phenomenal hip hinge movement that brilliantly teaches explosive glute engagement with minimal stress on the spine. By using a band anchored behind you, the resistance is horizontal, forcing your glutes to work overtime to drive your hips forward and extend powerfully. This makes it one of the best glute activation exercises for mastering the hip hinge pattern, crucial for both daily function and athletic power.
What sets the pull-through apart is its ability to load the glutes at the top of the movement, where they are strongest. Unlike many free-weight exercises where tension decreases at lockout, the band provides maximum resistance right when you need to squeeze the hardest. This unique resistance profile makes it a favorite in athletic performance programs for developing power and is frequently used in physical therapy settings to safely restore proper hip function.
How to Perform the Resistance Band Pull-Through
- Starting Position: Anchor a resistance band to a sturdy post or rack at about hip height. Stand facing away from the anchor point, straddle the band, and grab it between your legs with both hands.
- Execution: Walk forward a few steps to create tension in the band. With feet shoulder-width apart and a slight bend in your knees, hinge at your hips, pushing them straight back. Keep your spine neutral and your chest up as your torso lowers.
- Peak Contraction: Explosively drive your hips forward, squeezing your glutes powerfully as you return to a tall, standing position. The movement should be a powerful hip thrust, not a squat.
- Hold and Return: Squeeze and hold the peak glute contraction for a second at the top. Control the movement as the band pulls your hips back to the starting hinge position.
Common Mistakes to Avoid
- Squatting the Movement: A common error is bending the knees too much, turning the exercise into a squat. The primary movement must come from hinging at the hips, not from the knees.
- Rounding the Lower Back: Failing to maintain a neutral spine puts unnecessary stress on your lower back. Keep your core engaged and your chest proud throughout the entire repetition.
- Using Arms to Pull: Your arms should remain relatively straight and act only as anchors. The force to move the band should come entirely from your hips and glutes.
Pro Tip: Think of the movement as a "standing hip thrust." At the top of the rep, focus on tucking your pelvis under slightly (a posterior pelvic tilt) to achieve the most intense glute contraction possible.
Sets, Reps, and Progression
For activation, perform 3 sets of 12-15 explosive repetitions either during your warm-up or as a primary glute-focused movement in your workout. To increase the challenge, simply use a thicker, heavier resistance band or take an extra step away from the anchor point to increase the starting tension.
Top 8 Glute Activation Exercises Comparison
| Exercise | 🔄 Implementation Complexity | 🧰 Resource Requirements | 📊 Expected Outcomes (⭐) | 💡 Ideal Use Cases | ⚡ Key Advantages |
|---|---|---|---|---|---|
| Glute Bridges | 🔄 (low) — simple setup & movement | Bodyweight; optional bands/barbell | ⭐⭐⭐ — good activation, modest hypertrophy potential | Activation, rehab, beginners, desk-worker routines | Accessible anywhere; low spinal load; easy to progress |
| Hip Thrusts | 🔄🔄🔄🔄 (moderate→advanced) — bench setup & loading technique | Bench/elevated surface + barbell or bands + padding | ⭐⭐⭐⭐⭐ — top glute EMG, excellent hypertrophy & strength | Primary glute strength/hypertrophy work, athletic training | Highest glute activation; scalable heavy loading; strong transfer to performance |
| Single‑Leg RDLs | 🔄🔄🔄 (moderate) — balance and hip‑hinge skill required | Dumbbell/kettlebell or light barbell | ⭐⭐⭐⭐ — unilateral strength, stability, corrective benefits | Correcting imbalances, proprioception, single‑leg function | Addresses asymmetries; improves balance; low joint stress |
| Bulgarian Split Squats | 🔄🔄🔄 (moderate) — setup + balance under load | Bench/box + dumbbells/barbell | ⭐⭐⭐⭐ — strong single‑leg strength and hypertrophy stimulus | Leg symmetry, sport‑specific strength, lower spinal load programs | High front‑leg glute engagement; reduced spinal loading vs bilateral squats |
| Clamshells | 🔄 (very low) — simple isolation movement | None; optional resistance band | ⭐⭐ — excellent glute medius activation; limited glute max growth | Rehab, hip stability, prehab, activation work | Targets gluteus medius; beginner‑friendly and low injury risk |
| Donkey Kicks | 🔄🔄 (low) — basic quadruped movement | None; optional band/ankle weight | ⭐⭐ — strong activation/warm‑up tool; limited heavy loading | Warm‑ups, activation circuits, at‑home routines | High isolation of glute activation; minimal spinal load |
| Barbell Back Squats | 🔄🔄🔄🔄 (high) — technical & load management required | Barbell + rack/power cage (+ plates) | ⭐⭐⭐⭐ — major overall leg/glute development and metabolic effect | General strength, power, full‑body development, sport prep | High mechanical tension and load capacity; functional strength benefits |
| Resistance Band Pull‑Throughs | 🔄🔄 (low→moderate) — anchor technique + hip hinge cueing | Anchorable heavy band + space | ⭐⭐⭐ — good hip‑hinge patterning, glute/hamstring activation, power | Hip‑hinge teaching, power development, home/rehab settings | Variable resistance, low spinal load, effective bottom‑end tension |
Putting It All Together: Your Blueprint for Stronger Glutes
You now have a comprehensive toolkit filled with the best glute activation exercises designed to awaken, strengthen, and sculpt your posterior chain. We’ve moved beyond simple lists and delved into the specifics: the precise form for Glute Bridges, the power of a paused Hip Thrust, the balance required for Single-Leg RDLs, and the deep burn of a perfect Bulgarian Split Squat. Understanding how to perform these movements is the first crucial step, but the real transformation begins when you integrate them into a smart, consistent routine.
The goal of glute activation is not to exhaust your muscles before your main workout but to prime them. It’s about establishing a powerful mind-muscle connection, ensuring that when you step under the barbell for a squat or load the leg press, your glutes are ready to be the primary movers. A weak or "sleepy" posterior chain forces other muscles, like your lower back and hamstrings, to compensate, leading to imbalances, reduced power, and a higher risk of injury. By dedicating just 5-10 minutes to intentional activation, you are setting the stage for more effective, safer, and results-driven training sessions.
Creating Your Pre-Workout Activation Routine
Mastering this concept is simpler than it sounds. You don’t need to perform every exercise on this list before each workout. Instead, build a short, targeted warm-up that addresses your specific needs.
Here is a simple, effective framework:
-
Choose 2-3 Exercises: Select a variety of movements to hit the glutes from different angles. A great combination is one bilateral (both sides) movement and one unilateral (one side at a time) movement.
- Example 1 (Gym Day): Start with 2 sets of 15 Glute Bridges to wake up the gluteus maximus, followed by 2 sets of 12 Clamshells per side to fire up the gluteus medius.
- Example 2 (Home Workout): Begin with 2 sets of 15 Donkey Kicks per leg to isolate each glute, followed by 2 sets of 10 Bodyweight Bulgarian Split Squats per leg to prepare for more complex movement patterns.
-
Focus on Quality, Not Quantity: The rep and set recommendations are guidelines. Your primary focus should be on controlled movement and feeling the contraction in the target muscle. If you feel your lower back taking over during a Glute Bridge, reset your form, brace your core, and try again.
-
Use Progressive Overload: Just like with your main lifts, your activation routine can evolve. As you get stronger, you can add a resistance band to your bridges, hold a light dumbbell during your split squats, or increase the reps. This ensures your glutes are continually challenged and prepared for heavier loads.
Beyond Activation: A Holistic Approach to Growth
Building strong, well-defined glutes is a multi-faceted process that extends beyond your warm-up. Consistent, challenging workouts are the stimulus for growth, but recovery is where the magic truly happens. Proper nutrition, adequate protein intake, and sufficient rest are non-negotiable pillars of muscle hypertrophy. When training with intensity, it is also wise to consider how your efforts impact your entire body. For instance, heavy lifting and straining can sometimes lead to unwanted pressure in the pelvic region. To ensure your glute training supports your overall health, it's beneficial to understand how different types of physical activity can affect other bodily conditions, including learning about exercises that help or hurt hemorrhoids. Being informed allows you to train hard while also prioritizing your long-term well-being.
By combining the best glute activation exercises from this guide with a solid training program and a commitment to recovery, you are creating a powerful system for success. You are no longer just "working out"; you are training with purpose, intention, and intelligence. This strategic approach is what separates those who see slow progress from those who build the strong, functional, and aesthetically pleasing physique they desire. Embrace this blueprint, stay consistent, and get ready to unlock your true potential.
Ready to maximize your muscle-building potential and get the most out of every single rep? Bold Buns offers a premium creatine formula specifically designed to enhance strength, power, and muscle cell hydration, giving you the edge you need to build stronger glutes faster. Elevate your training and recovery by visiting Bold Buns to fuel your fitness journey.